Bathroom refurbishments, if carefully planned and budgeted, can be one of the most rewarding and satisfying DIY projects to undertake and deliver into a home. A tired, damaged or dated bathroom is like an irritating eyesore: it's a problem that constantly stares you in the face and it just gets worse each time you go there.
Frame Risers
Upgrading a bathroom suite or separate cloakroom and toilet does not have to cost a fortune, or commit you to unaffordable credit. I can't emphasise enough, when undertaking such a project, keep your investment within budget and don't be tempted by state of the art mod cons on display in bathroom centre showrooms, and builders' or plumbers' merchants' displays.
Frame Risers
The more you plan, the less chance of the project going down the pan!
Systematically write down a list of priority bathroom fittings and replacements, and then undertake your own research into what is available and where you can source it for the best possible price.
Choosing a New Bathroom Suite
Online research can source both local builders' merchants and DIY suppliers as well as the nearest plumbers' merchant's depot, or a specialist supplier from further afield.
Pre-set a total budget ceiling to purchase and install your new bathroom suite, and be sure to itemise each item you wish to secure be it a close-coupled toilet and cistern, pedestal and hand basin, bath, shower screen, shower head and riser support, and water and waste piping.
Look online at suppliers' websites and systematically check out their prices and delivery costs, and individual product specifications. Be sure to check product sizes, especially in areas of limited floor space like a bathroom, cloakroom, or bedroom en-suite. It is no use buying products from different suppliers if they won't easily fit in the floor layout you are planning.
Research is the key to keeping within budget and not getting tempted or carried away with expensive, state of the art bathroom designs.
Design Styles
With so many contemporary and classical bathroom designs to choose from, and so many architectural features to consider in homes today - it is to keep an open mind and conduct as much research online as you feel is necessary to get the best designs and the best value for money offers in the marketplace. Visit show rooms to get an idea of how things might look and paint a visual picture of the future of your bathroom. Don't get carried away, remember, you'll have limited room.
There are literally hundreds of traditional or contemporary designs to choose from and the decision will be a subjective one as it is your property you are upgrading.
Prioritise Requirements
Is it to be a plastic or steel bath you require? Or possibly a free-standing, Victorian roll-top design with clawed feet? Are you simply looking to replace an old, coloured, plastic bath with a new plain white design plus taps, washers, waste, and side and end panels? Is your project a major refurbishment job where an old bathroom suite and pipes need to be removed and replaced with a stunning new classical design?
Do you intend investing in an eco-friendly, contemporary suite with water flow controls to reduce excessive consumption? This is something worth considering if you are on a water meter or have a large family. These modern flow controls can reduce water consumption by up to 80% leading to health savings on your utility bills.
Discipline and tight budget controls are key to making the right decisions, as well as taking professional advice from any trade experts in your local showrooms.
Planning Your New Bathroom
It is extremely wise to draw out a new floor plan and immediately mark out your total floor space, entry door, waste exit point, hand basin, toilet, bidet, bath and shower positions, together with areas of travel for people to get in and out freely.
You also need to consider if an extractor fan is necessary. It can be essential if you plan to address the problem of condensation, especially in winter. It can be fitted into an outside wall or window, or with conduit tunnelling into an attic and across to an outside wall.
Electrics
Did you know it is illegal to install any electric wall sockets or plug socket systems into a bathroom, except a modern shaver socket and cover? Only ceiling light pull cords can be installed within the bathroom. Ceiling light wall switches can be installed outside the bathroom entry door on an adjacent wall in the hallway or first floor landing area. All electric fittings must conform with current I. E. E. wiring regulations and building regulations. If unsure, consult and commission a qualified electrician to advise you on re-wiring or planning any bathroom wiring requirements. Always get at least 2 quotations if you intend asking an electrician to complete the rewiring project, or test the existing electricity circuits before planning your extractor fan, or entertainment, lighting and electrical installations.
En-Suite Facilities
Not only might you be considering upgrading a bathroom or cloakroom, but you may also be planning to convert a small bedroom or box room into a new en-suite facility as the children grow up.
Again, careful consideration about budgets, designs and layout plans - (including drawings with standing areas clearly marked) - are the maxims to achieving success. Purchase of fixtures and fittings should not be undertaken before all your plans have been meticulously drawn, tested and approved by all the family.
Disposing of waste from an en-suite toilet, shower, bath or hand basin to the property's soil stack may not always be possible without installing a Macerator pump. Even if your new en-suite facilities are being installed on the opposite side if the house to an existing soil stack, it will be possible to complete the installation by adding a Macerator pump and 32mm waste exit pipes.
Removal of an Old Bathroom or Cloakroom Fittings
Listing the sequence of events - together with their estimated timings - is a very wise part of your bathroom conversion plans. Getting things done in the right order can make all the difference. Here is an example list to consider:
1. Fit stop cocks to pipes from cold water storage tank and hot water cylinder supply.
2. Turn off water supplies. Flush toilet. Turn on all old taps and drain off all water in existing pipes.
3. Remove old bath, toilet, hand basin, pedestal and toilet, including cistern and waste pipes. Be sure you have assistance, especially if removing a heavy steel bath. Ensure you have the appropriate tools like wrenches, power drill and driver, hacksaw and pipe cutters.
4. Start by removing the toilet and cistern tank. Disconnect the cistern downpipe to the pan first by unscrewing the nut beneath the cistern and then unscrewing the connection at the pan end. Remove any wall screws and disconnect the cistern. Then remove the pan floor screws and lift the pan from its flooring position.
5. When removing the pan, be careful not to damage its soil pipe. Cover the soil pipe exit with a cloth to prevent any debris from getting into the soil pipe.
6. Check for any damage or repairs needed in the floor boards or wall plaster after removing the cistern and toilet.
7. Continue by removing the pedestal and hand basin, by disconnecting taps and unscrewing all wall brackets to lift the basin and pedestal. Again check for any subsequent repairs to the wall or floor.
8. Remove Bath: Take out any side or end panels. Disconnect hot and cold taps using a wrench. Disconnect waste pipe and water supply pipes. Lift bath with help from an assistant. Manipulate bath out of the bathroom and remove from the building. Check for any damage to existing walls, plaster or floor boards.
9. Now plan the positioning of new water supply pipes and any waste pipes' exit routes to the soil stack.
10. Remove any remaining old fixtures and fittings like towel rails, toilet roll holders, bathroom cabinets, mirrors etc. Repair any screw holes in the walls using the appropriate plaster filler.
11. Have any old electric wiring or ceiling lights tested and take advice on their replacement, using a qualified electrician.
TRADE TIP: Do not remove any old fittings before you have purchased all the new replacement bathroom fittings and double check they are the correct size; come complete with all taps, washers, screws, waste pipes and supports; are neither chipped, cracked or damaged in any way whatsoever; and you have a reliable assistant to help with any lifting and removal of old fittings, and the installation of your new bathroom suite.
NOTE: Removal of lead pipes can earn you a few quid at the local scrap yard, and advertising old bathroom suites on a local RECYCLE/GREEN website can find a grateful new owner rather than dumping your old fittings into a local Council landfill tip.
Installing New Bathroom Fittings
Read all the manufacturers' fitting instructions carefully, first and don't start any new installations before you have checked through each component box, and double-checked that all the fittings and screws/piping pieces are included.
TOILET:
1. Connect the special plastic and rubber pan connector to the exit soil pipe, having first removed the soil pipe's temporary debris rag cover.
2. Then screw the pan into your bathroom floor using the manufacturer's screws supplied, together with their plastic head covers. Ensure it is positioned at the correct level using a spirit level.
3. Position the close-coupled cistern tank above and connect the water supply, plus water supply to the pan and the overflow pipe to its exit pipe.
Always fit an isolating valve to the new water supply pipes for simplifying any maintenance in future.
Bath and Hand Basin
1. Always check all components are complete in both product packages, including waste outlet pipes. Follow the manufacturer's fitting instructions to the letter.
2. Fit washers, taps, overflows and waste pipes first, before installing the bath and wash basin and pedestal in position.
3. Water supplies to the hand basin are from 15mm copper pipes and 22mm copper pipes for the bath.
4. Waste water from the hand basin will run away into its soil pipe through either a U-trap or bottle trap beneath the basin and it's new, 32mm plastic pipework.
5. Waste water from the bath will run into its soil pipe through new, 40mm push-fit, plastic piping.
6. Use the bath's two steel floor supports and adjustable feet beneath its design to create the water outflow along a suitable downfall by applying a spirit level. Don't guess this critical water downfall.
7. Fitting new servicing stop valves in the water supply pipes is a prudent move during these upgrade installations.
8. Fit both the new bath side and end panel as per the manufacturer's instructions using the screws provided.
Tiling and Decorative Finishes
Always be sure you are using waterproof wall tile adhesive and grouting when tiling around hand basins, baths, shower enclosures and wet rooms. Use professional plastic spacers when mounting each wall tile. Follow manufacturers' fixing and grouting instructions to the letter and you will then achieve a professional finish.
Do not affix wall tiles to a new bathroom floor. Ceramic or cork floor tiles, or a vinyl floor covering can be fitted to achieve an attractive finish to your bathroom everyone will admire.
Wall and floor tiles today come in a multitude of designs and surface finishes from slate, to earthenware or a high glaze finish, and in plain or patterned colour ways. Again, classical or contemporary designs are available to complement your new bathroom suite or cloakroom.
Be sure to invest in a tile cutter to fit all the tiles in any tight spaces, or around a bath or hand basin, or door frame.
Sealants
Before the new bathroom installation can be classed as waterproof and complete, you must seal any gaps between the bath and basin, and any adjacent wall tiles. Flexible, waterproof silicon sealants are essential to prevent any water dripping and damaging the grouting and plasterwork beneath your new bathroom or cloakroom walls and floors.
Furniture and Fittings
Embellishing your attractive new bathroom or shower room with furniture, mirrors or accessories will give it that ultimate finish, and provide storage for people's personal effects like towelling, shampoos, shower gels, hair sprays, deodorants and shaver systems. In addition, it's those little extras like toilet roll holders, glass shelving and artefacts that make it a statement worth delivering.
TRADE TIP: If using a power drill to make a screw hole into a glazed wall tile, place a criss-cross strip of masking tape onto the tile first and then mark the exact drill spot. Switch the drill to a slower speed and apply moderate pressure when starting to drill into the surface. This will prevent a sudden slip and damage to your tile surface. Withdraw the drill and increase the speed to achieve the finished depth required.
Affix all bathroom furniture and fittings only with the manufacturers' screws and wall plugs provided.
Congratulations - you now have a beautiful new bathroom everyone in the household is proud to use.
Planning and Plumbing a New Bathroom Installation
Frame Risers
Dec 11, 2011 22:56:53

Click for larger image and other views
 >> Click here to update Christmas prices for K45G-Heavy Duty Queen Metal Bed Frame with Center Support and 6 Glide Supports Fully Adjustable Queen, King, Cal King <<
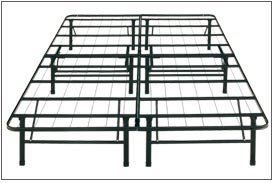
Christmas Sales K45G-Heavy Duty Queen Metal Bed Frame with Center Support and 6 Glide Supports Fully Adjustable Queen, King, Cal King Feature
- No nuts bolts or tools required for assembly
- Heavy Duty side rails and cross arms.
- Adjustable to fit Queen, King or Cal King Beds.
- Double angle iron rigid center for support and stability.
- Sturdy construction; riveted; fit virtually all headboards.
Christmas Sales K45G-Heavy Duty Queen Metal Bed Frame with Center Support and 6 Glide Supports Fully Adjustable Queen, King, Cal King Overview
This fully adjustable heavy duty steel bed frame fits Queen, King or Cal King size bedding. This heavy duty bed frame has a double angle iron rigid center support with two legs to provide maximum strength and distribute the weight evenly supporting your box spring / foundation even in the middle. The heavy duty side rails and cross arms will adjust to fit queen, king or california king beds. No nuts, bolts or tools required for assembly.
SAVE NOW on Christmas Sales Offers below!
Available In Stock. |
| This Christmas K45G-Heavy Duty Queen Metal Bed Frame with Center Support and 6 Glide Supports Fully Adjustable Queen, King, Cal King ships for FREE with Super Saver Shipping. |
|

Limited Offer Today!! K45G-Heavy Duty Queen Metal Bed Frame with Center Support and 6 Glide Supports Fully Adjustable Queen, King, Cal King Christmas and Cyber Monday 2011 Deals
Counter Stools Wood